Post Install
Recommended Post-Installation Steps
Section titled “Recommended Post-Installation Steps”Updating The System
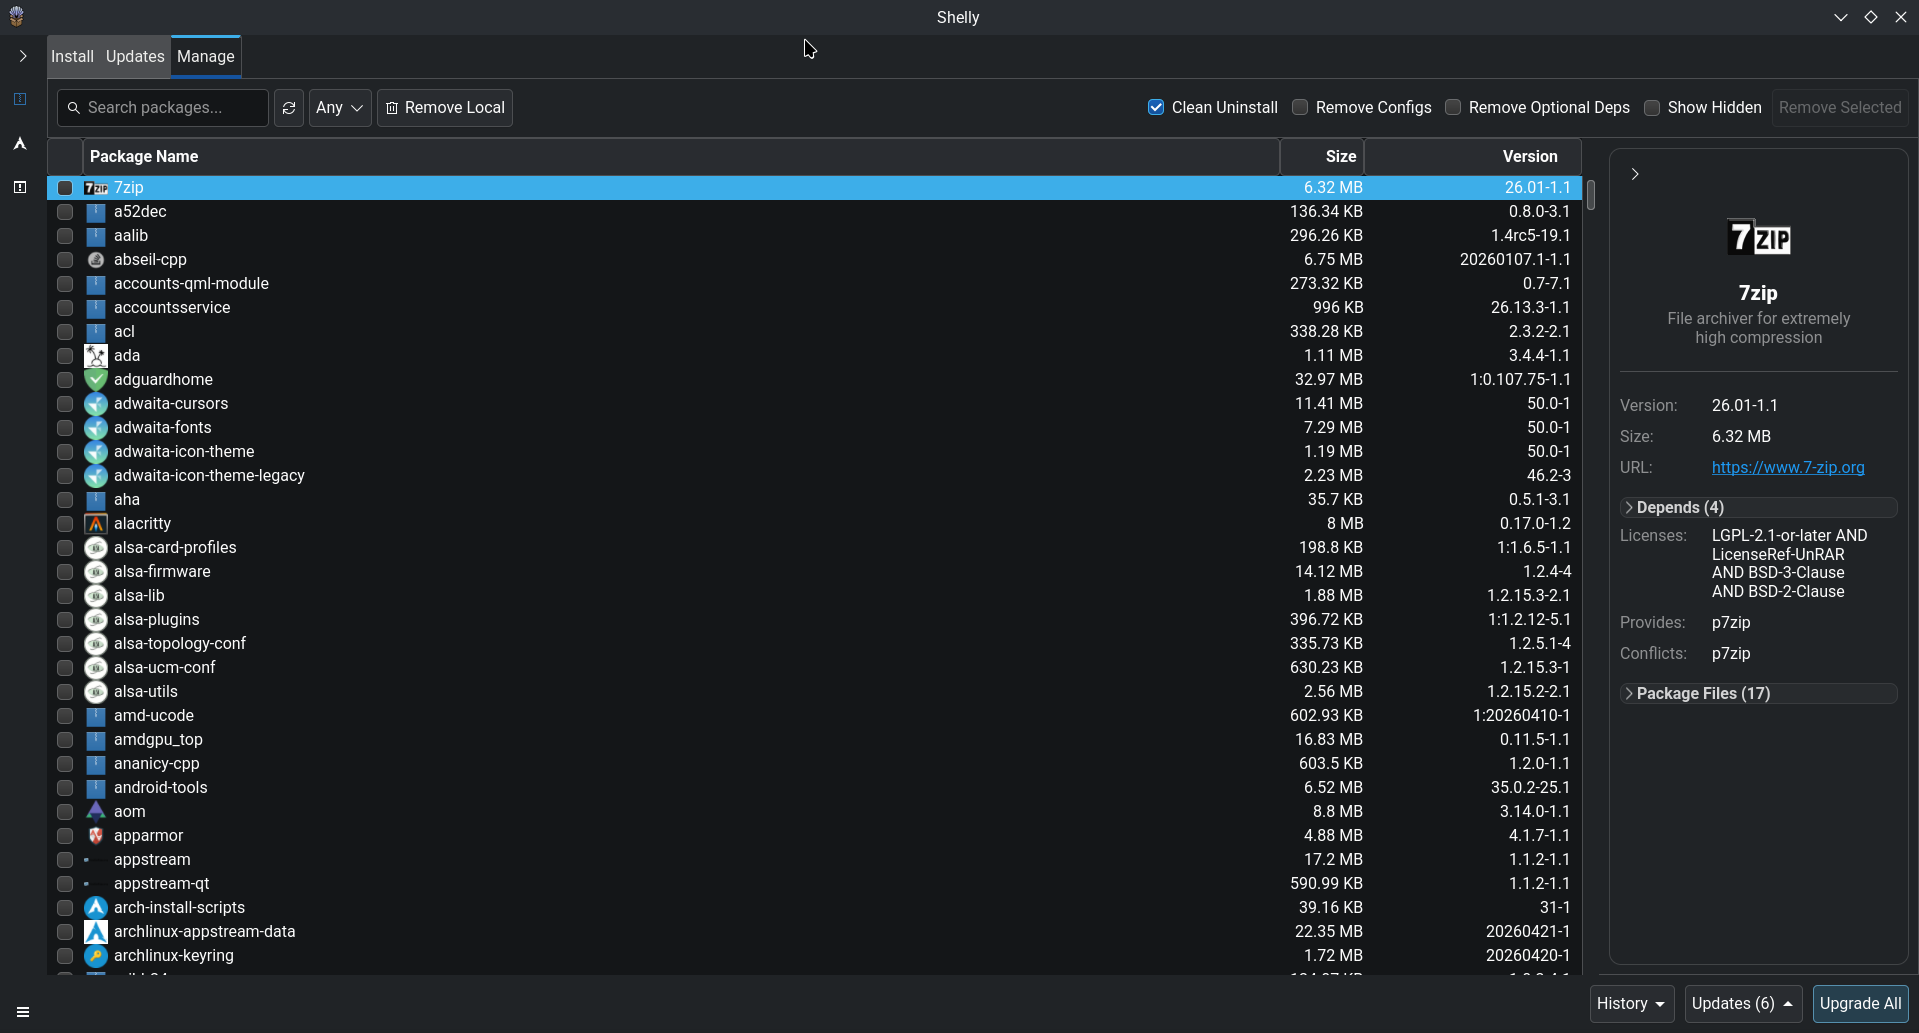
Section titled “Updating The System”Shelly is a modern reimagination of the Arch Linux package manager, designed to be a more intuitive and user-friendly alternative to pacman and octopi.
Developed by: Seafoam-Labs
Allowing users to manage their packages without needing to use the terminal.
Some of the features of Shelly include:
Install/Uninstall packages from the AUR, official repositories, AppImages, Flatpaks and local packages, view package details, manage package groups, and more.
Why choose Shelly over Octopi?
- It has a more modern and user-friendly interface.
- Continuous development and updates with new features and improvements.
- Supports more package formats (AUR, AppImages, Flatpaks, etc.)
- Security features like PKGBUILDs verification, see the Security Checks for more information.
Shelly’s Homepage Screenshot
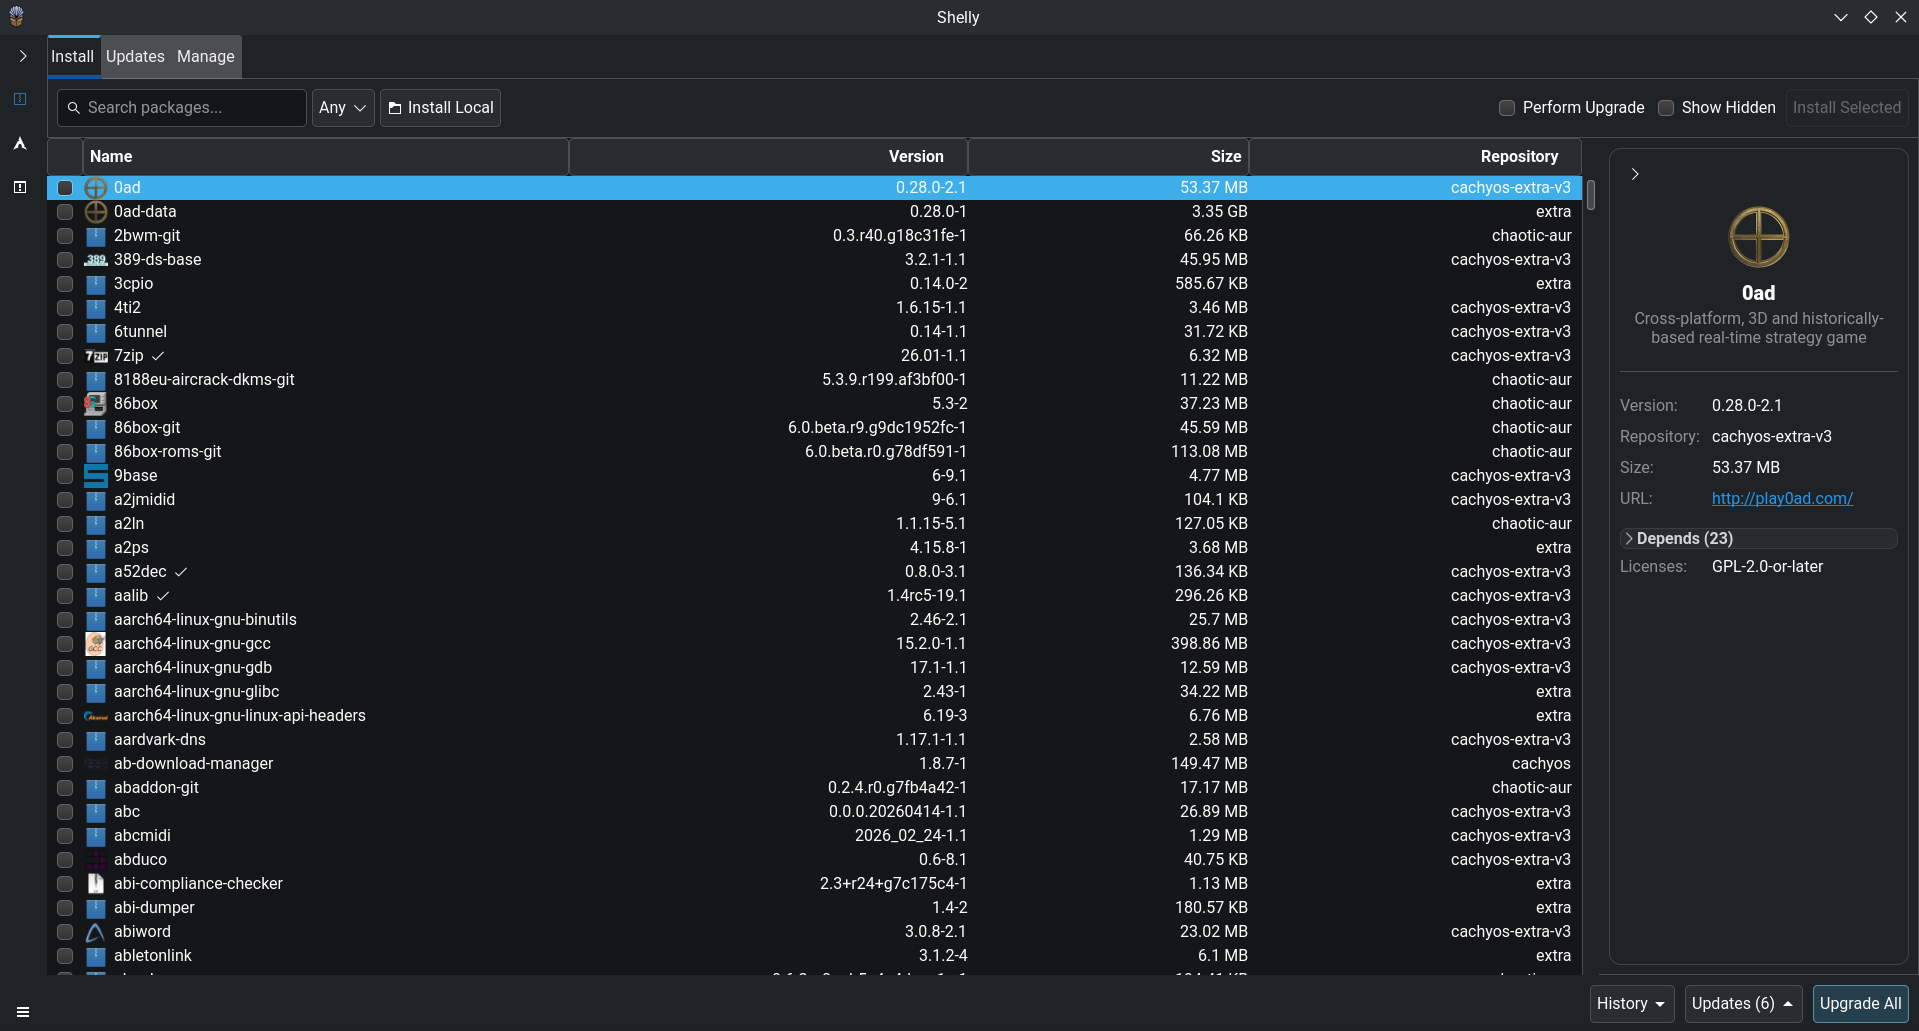
Package Management Tab
Here are some useful commands to get you started with Shelly’s CLI:
Upgrade all the packages (AUR, official repositories, Flatpak, etc.):
shellyUpgrade standard packages (Arch derivates) + install package:
shelly install --upgrade {pkg}# Example:shelly install --upgrade discordRemove package and dependencies:
shelly remove {pkg}# Example:shelly remove discordSearch AUR package:
shelly aur search {pkg}Octopi is a graphical package manager for Arch-based distributions that provides a convenient way to manage packages and updates. To update your system with Octopi, follow these steps:
- Launch Octopi from the application menu.
- In the main window, click on the Check updates button (Top left), now next to it System upgrade.
- Octopi will now check for available updates and prompt you to either install them on Octopi itself or in a terminal.
- To proceed with the update, click the Apply button.
- Octopi will download and install the updates.
- It is advised to reboot your computer after a big update (especially if the kernel got an update).
-
Open a terminal emulator (or press
ctrl + alt + t-mod + returnin a WM e.G Qtile). -
Run the following command to update the system:
Terminal window sudo pacman -Syu -
It is advised to reboot your computer after a big update (especially if the kernel got an update).
CachyOS supports offline system upgrades using the pacman-offline script. This allows your system to download package updates and apply them on the next reboot. (Yes like on Windows)
-
Install the pacman-offline package
Terminal window sudo pacman -S pacman-offline -
Telling Pacman to read from the separate package ignore list.
Add the following line to the /etc/pacman.conf file Include = /etc/pacman.d/offline.confExample
/etc/pacman.conf # REPOSITORIES# - can be defined here or included from another file# - pacman will search repositories in the order defined here# - local/custom mirrors can be added here or in separate files# - repositories listed first will take precedence when packages# have identical names, regardless of version number# - URLs will have $repo replaced by the name of the current repo# - URLs will have $arch replaced by the name of the architecture## Repository entries are of the format:# [repo-name]# Server = ServerName# Include = IncludePath## The header [repo-name] is crucial - it must be present and# uncommented to enable the repo.## GENERAL OPTIONS[options]# other options like 'Color', 'CheckSpace', etc. can be hereInclude = /etc/pacman.d/offline.conf -
Adding the CachyOS kernels in order to make pacman ignore them during regular updates
The
pacman-offlinetool uses this file to determine which packages to ignore during the traditional pacman updates.Example: when you run
sudo pacman -SyuReplace the contents of the
/etc/pacman.d/offline.conffile with the following:# Arch Linux kernelsIgnorePkg = linux linux-headers linux-docsIgnorePkg = linux-lts linux-lts-headers linux-lts-docsIgnorePkg = linux-zen linux-zen-headers linux-zen-docsIgnorePkg = linux-hardened linux-hardened-headers linux-hardened-docs# CachyOS kernelsIgnorePkg = linux-cachyos linux-cachyos-headers linux-cachyos-nvidia-open linux-cachyos-zfsIgnorePkg = linux-cachyos-bmq linux-cachyos-bmq-headers linux-cachyos-bmq-nvidia-open linux-cachyos-bmq-zfsIgnorePkg = linux-cachyos-bore linux-cachyos-bore-headers linux-cachyos-bore-nvidia-open linux-cachyos-bore-zfsIgnorePkg = linux-cachyos-deckify linux-cachyos-deckify-headers linux-cachyos-deckify-nvidia-open linux-cachyos-deckify-zfsIgnorePkg = linux-cachyos-eevdf linux-cachyos-eevdf-headers linux-cachyos-eevdf-nvidia-open linux-cachyos-eevdf-zfsIgnorePkg = linux-cachyos-gcc linux-cachyos-gcc-headers linux-cachyos-gcc-nvidia-open linux-cachyos-gcc-zfsIgnorePkg = linux-cachyos-hardened linux-cachyos-hardened-headers linux-cachyos-hardened-nvidia-open linux-cachyos-nvidia-hardened-zfsIgnorePkg = linux-cachyos-lts linux-cachyos-lts-headers linux-cachyos-lts-nvidia-open linux-cachyos-lts-zfsIgnorePkg = linux-cachyos-rc linux-cachyos-rc-headers linux-cachyos-rc-nvidia-open linux-cachyos-rc-nvidia-open linux-cachyos-rc-zfsIgnorePkg = linux-cachyos-rt-bore linux-cachyos-rt-bore-headers linux-cachyos-rt-bore-nvidia-openIgnorePkg = linux-cachyos-server linux-cachyos-server-headers linux-cachyos-server-nvidia-open linux-cachyos-server-zfsNow all of those packages are going to get ignored in the regular updates but checked during the offline preparation.
-
Start the preparation for the offline update only once
Run the following command sudo systemctl start pacman-offline-prepare.serviceThis command will then make pacman-offline to execute once and synchronize the package databases and proceed to download updates but doesn’t install them.
If you want this script to be automated. Follow the following steps:
-
Enable the preparation timer
The
pacman-offline-prepare.timerbeing enabled will allow systemd to trigger this script to download updates in a daily basis after a few minutes of every system startup.Terminal window sudo systemctl enable pacman-offline-prepare.timer -
Reboot your system:
The updates will be installed during the next system reboot.
-
(Optional) Automatic System Reboots:
Enable the
pacman-offline-reboot.timerto automatically reboot your system by default at 3am (Your timezone) if they’re pending updates. Be aware that its not always at the same time schedule due to the inclusion ofRandomizedDelaySecwhich is set to 2 hours by default.Terminal window sudo systemctl enable pacman-offline-reboot.timer
Fork of Arch-Update
An update notifier & applier for Arch Linux that assists you with important pre / post update tasks. Includes a dynamic & clickeable systray applet for an easy integration with any Desktop Environment / Window Manager.
How to enable Cachy-Update
Enable Cachy-Update inCachyOS Hello > Apps/Tweaks > Cachy Update enabledHow to disable Cachy-Update
Open a terminal and run the following commands:sudo systemctl --global disable arch-update-tray.servicesudo systemctl --global disable arch-update.timer- Features:
- Automatic check and listing of available updates.
- Check for recent Arch Linux news (and offers to display them if there are).
- Check for orphan packages (and offers to remove them if there are).
- Check for old & uninstalled packages in cache (and offers to remove them if there are).
- Check for pending kernel update requiring a reboot (and offers to do so if there’s one).
- Check for services requiring a post upgrade restart (and offers to do so if there are).
- Support for
sudo,sudo-rs,doas&run0.
Update check interval: Once 15 seconds after boot and then every hour.
- How to change the update check interval:
systemctl --user edit --full arch-update.timer# Tip: You can also use any text editor of your choice instead of `nano`# e.g EDITOR=micro systemctl --user edit --full arch-update.timerDefault contents of the file:
[Timer]OnStartupSec=15 # Check for updates 15 seconds after bootOnUnitActiveSec=1h # Check for updates every hourBasically you can change the OnUnitActiveSec value to whatever you want. For example, if you want to check for updates every 30 minutes, change it to 30m. or every 6 hours, change it to 6h. Check this document for more details on how to set the time interval.
In case you want Cachy-Update to check for new updates only once at boot, you can simply delete the OnUnitActiveSec line completely.
Thanks to Antiz for maintaining the upstream Arch-Update project and for the implementation of Cachy-Update
Configuring Firewall (ufw)
Section titled “Configuring Firewall (ufw)”To configure ufw, follow these steps:
sudo ufw enablesudo ufw disableBy default, ufw ignores incoming, and allows outgoing traffic; you can add specific rules to the firewall to block or allow specific connections.
# Example 1, allow ssh traffic:sudo ufw allow ssh# Example 2, open port 12345 for TCP & UDP traffic:sudo ufw allow 12345
# Text or port number can be adjusted as needed, as 12345/udp to only allow UDP-traffic or replacing ssh with a program name
By default, ufw ignores incoming, and allows outgoing traffic; you can add specific rules to the firewall to block or allow specific connections.
# Example 1, deny ssh traffic:sudo ufw deny ssh# Example 2, close port 12345 for TCP & UDP traffic:sudo ufw deny 12345
# Text or port number can be adjusted as needed, as 12345/udp to only deny UDP-traffic or replacing ssh with a program namesudo ufw status verboseConfigure Wi-Fi Regulatory Domain
Section titled “Configure Wi-Fi Regulatory Domain”The wireless-regdb package includes a database of wireless rules (allowed frequencies, channels, power limits) for various countries. Setting the right region for your location can unlock specific Wi-Fi channels (such as channels 12/13 or 5GHz/6GHz bands) that may be limited by default, helping to improve your Wi-Fi performance and connection quality.
Configuration:
- Edit the configuration:
Open
/etc/conf.d/wireless-regdomwith root privileges.Terminal window sudo micro /etc/conf.d/wireless-regdom - Set your country:
Uncomment the line with your two-letter ISO country code (e.g.,
WIRELESS_REGDOM="US"). Ensure only one country is uncommented. - Reboot: A reboot is typically required for the change to take effect.
Verification:
To check the currently applied regulatory domain, use this command:
iw reg getglobalcountry 00: DFS-UNSET # Country 00 uses global defaults (755 - 928 @ 2), (N/A, 20), (N/A), PASSIVE-SCAN (2402 - 2472 @ 40), (N/A, 20), (N/A) (2457 - 2482 @ 20), (N/A, 20), (N/A), AUTO-BW, PASSIVE-SCAN (2474 - 2494 @ 20), (N/A, 20), (N/A), NO-OFDM, PASSIVE-SCAN (5170 - 5250 @ 80), (N/A, 20), (N/A), AUTO-BW, PASSIVE-SCAN (5250 - 5330 @ 80), (N/A, 20), (0 ms), DFS, AUTO-BW, PASSIVE-SCAN (5490 - 5730 @ 160), (N/A, 20), (0 ms), DFS, PASSIVE-SCAN (5735 - 5835 @ 80), (N/A, 20), (N/A), PASSIVE-SCAN (57240 - 63720 @ 2160), (N/A, 0), (N/A)Look for the country XX: line, where XX should match the code you set. If it shows country 00:, the system might be using default restrictions or hasn’t yet determined the region.
iw reg getglobalcountry US: DFS-FCC # Country correctly shows as US (902 - 904 @ 2), (N/A, 30), (N/A) (904 - 920 @ 16), (N/A, 30), (N/A) (920 - 928 @ 8), (N/A, 30), (N/A) (2400 - 2472 @ 40), (N/A, 30), (N/A) (5150 - 5250 @ 80), (N/A, 23), (N/A), AUTO-BW (5250 - 5350 @ 80), (N/A, 24), (0 ms), DFS, AUTO-BW (5470 - 5730 @ 160), (N/A, 24), (0 ms), DFS (5730 - 5850 @ 80), (N/A, 30), (N/A), AUTO-BW (5850 - 5895 @ 40), (N/A, 27), (N/A), NO-OUTDOOR, AUTO-BW, PASSIVE-SCAN (5925 - 7125 @ 320), (N/A, 12), (N/A), NO-OUTDOOR, PASSIVE-SCAN (57240 - 71000 @ 2160), (N/A, 40), (N/A)Enabling Global Menu
Section titled “Enabling Global Menu”For some apps like Visual Studio Code, the global menu may not work or may be attached to the parent app instead of the panel.
# To enable global menu support, run the command and restart the app.sudo pacman -S appmenu-gtk-module libdbusmenu-glibOptional Configurations
Section titled “Optional Configurations”Changing the Default Shell
Section titled “Changing the Default Shell”Currently, CachyOS uses fish as the user’s default login shell. However, you can change the default shell to whatever you like.
This is the default shell on almost every Linux distribution. It is also still used as the root user’s login shell. bash has basic autocomplete functionality and easy history management. It differs from zsh and fish in that it doesn’t have the fancy customization and plugin ecosystem that both fish and zsh have.
chsh -s /usr/bin/bashWe provide a zsh config with commonly used plugins and configurations. It aims to have 1:1 functionality with our fish config. This is also the default shell used in MacOS.
chsh -s /usr/bin/zshUpdating/using tldr
Section titled “Updating/using tldr”This tool is extremely useful for those who don’t want to read much or waste time reading a help/man page.
-
Open a terminal and run the following command tldr --update - Example of using tldr:
Terminal window tldr javaExecute a `.jar` program:java -jar filename.jar# As you can see, it's really useful, and new tools/pages get added over time.
Managing Appimages
Section titled “Managing Appimages”Appimages are portable applications that run on most Linux distributions without needing installation or root permissions.
To manage AppImages, you can use gearlever, which provides an easy way to integrate AppImages into your system.
gearlever is a graphical tool that simplifies the management of AppImages on your system. It integrates with your desktop environment, making it easy to run and manage AppImages.
To install gearlever, follow these steps:
- Install flatpak if you haven’t already:
Terminal window sudo pacman -S flatpak - Restart your system.
- Install gearlever using flatpak:
Terminal window flatpak install flathub it.mijorus.gearlever - After installation. Log out and log back in to see gearlever in your application menu.
Configuring Access to Samba Shares
Section titled “Configuring Access to Samba Shares”Samba is a free software re-implementation of the SMB networking protocol. To connect to your samba server, a useful config has been made available to CachyOS users, but it requires changing the configuration of your samba server.
Installing and using the CachyOS smb.conf file
Section titled “Installing and using the CachyOS smb.conf file”To use the convenient smb.conf file, first install a specific package that provides the required smb.conf file. Then, replace your server’s existing smb.conf with this file and reconfigure your shared volumes.
-
Create a backup of your original
smb.conffile, typically located at/etc/samba/smb.confon Linux systems. -
Install the CachyOS Samba settings package on your client machine:
Terminal window sudo pacman -S cachyos-samba-settings -
Copy the
smb.conffrom your client machine to the Samba server. -
Open and edit the file to add your shared directories, printers, etc.
-
Restart the Samba service on your server:
Terminal window sudo systemctl restart --now samba -
On the client machine, access your shared resources through your file manager (e.g.,
smb://<your_server_ip>/<share_name>).If configured correctly, you’ll be prompted for login credentials. Remember to select the option to save your login information if desired.
AppArmor support using AppArmor.d profiles
Section titled “AppArmor support using AppArmor.d profiles”Quote from Wikipedia:
AppArmor (“Application Armor”) is a Linux kernel security module that allows the system administrator to restrict programs’ capabilities with per-program profiles. Profiles can allow capabilities like network access, raw socket access, and the permission to read, write, or execute files on matching paths.
This is only an introduction on how to install a basic AppArmor setup, if you’re not familiar with AppArmor. Please do not proceed without understanding the implications.
For more detailed information about AppArmor.d and how to create your own profiles, check the AppArmor.d documentation.
-
Add the following kernel parameters to your Boot Manager, see Boot Manager Configuration for reference
lsm=landlock,lockdown,yama,integrity,apparmor,bpf -
Install apparmor and apparmord (Set of over +1500 profiles) packages
Terminal window sudo pacman -S apparmor apparmor.d -
Enable/Start AppArmor service
Terminal window systemctl enable --now apparmor.service -
Enable caching for AppArmor profiles
/etc/apparmor/parser.conf ## Add the following lines:write-cacheOptimize=compress-fastcache-loc /etc/apparmor/earlypolicy/Save the file and reboot.