Btrfs Snapshots
Introduction
Section titled “Introduction”What is a Btrfs snapshot?
Section titled “What is a Btrfs snapshot?”Let’s start with the basics:
Btrfs snapshots come from the feature of subvolume. What is a subvolume you might ask?. Think of a subvolume as a separate filesystem within the Btrfs filesystem. Allowing you to segment your data in different parts. That’s why for example in CachyOS we have different subvolumes for:
- Root filesystem: (
/) - Root directory: (
/root) - Home directory: (
/home) - Var directories: (
/var/cache,/var/tmp,/var/log) - Srv directory: (
/srv)
By having different subvolumes for these directories, we can manage them independently, apply different settings and most importantly create snapshots for them.
This is where a snapshot is born. A snapshot is essentially a read-only or read-write (default) copy of a subvolume at a specific point in time. This means you can capture the state of your filesystem, including all files and directories, at that moment.
Therefore snapshots become a point-in-time reference meaning when the target file diverges from the snapshot data, the snapshot will keep the original file and the target will create a new file with the changes and the snapshot remains the same forever, that’s why some users refer to a snapshot as “data frozen in time”.
Imagine taking a photograph of your filesystem at a specific moment, and you can always go back to that photograph whenever you need to.
One of the key advantages of snapshots is that they are very space-efficient because it’s just a reference to the original data until changes are made.
But this is where a snapshot diverges from a traditional backup. Let’s say your disk crashes, if you had a traditional backup, you could restore your data from that backup. However, if you only had snapshots on the crashed disk, you would lose access to those snapshots since they are stored on the same disk.
Recovery Cases where snapshots are useful and not useful
Section titled “Recovery Cases where snapshots are useful and not useful”They’re useful recovering from:
- Broken or corruption after system updates.
- Misconfigurations that prevent the system from booting.
- Accidental file deletions or modifications.
They’re not useful recovering from:
- Bootloader issues.
- Hardware failures (e.g., failing hard drives).
Managing snapshots (GUI & CLI)
Section titled “Managing snapshots (GUI & CLI)”A few things to consider before managing snapshots. Applies to both CLI and GUI methods.
- A maximum of 10 snapshots are recommended to be kept. Beyond that, snapshots become too old and less useful. In a worst case scenario, reverting to an old snapshot may introduce compatibility issues with newer software versions.
- Snapshots ideally are meant to be used for recovery purposes. Although you can use them to undo changes to files without restoring the entire snapshot.
- Add a meaningful description when creating snapshots. This will help you identify the purpose of each snapshot later on.
Btrfs Assistant (GUI)
Section titled “Btrfs Assistant (GUI)”Before proceeding, ensure you have btrfsmaintenance installed to take advantage of automatic snapshot management features.
For those who prefer managing Btrfs, snapshots, and more through a GUI. Btrfs Assistant is an awesome project for beginners.
Automatic Snapshots Cleanup Setup
Section titled “Automatic Snapshots Cleanup Setup”We’re going to set up automatic snapshot cleanup using Btrfs Assistant. This will help manage your snapshots effectively without manual intervention.
Follow these steps:
-
Launch Btrfs Assistant by opening a terminal and running:
Terminal window btrfs-assistant-launcherAlternatively:
Terminal window sudo -E btrfs-assistant -
Navigate to the Snapper Settings tab:
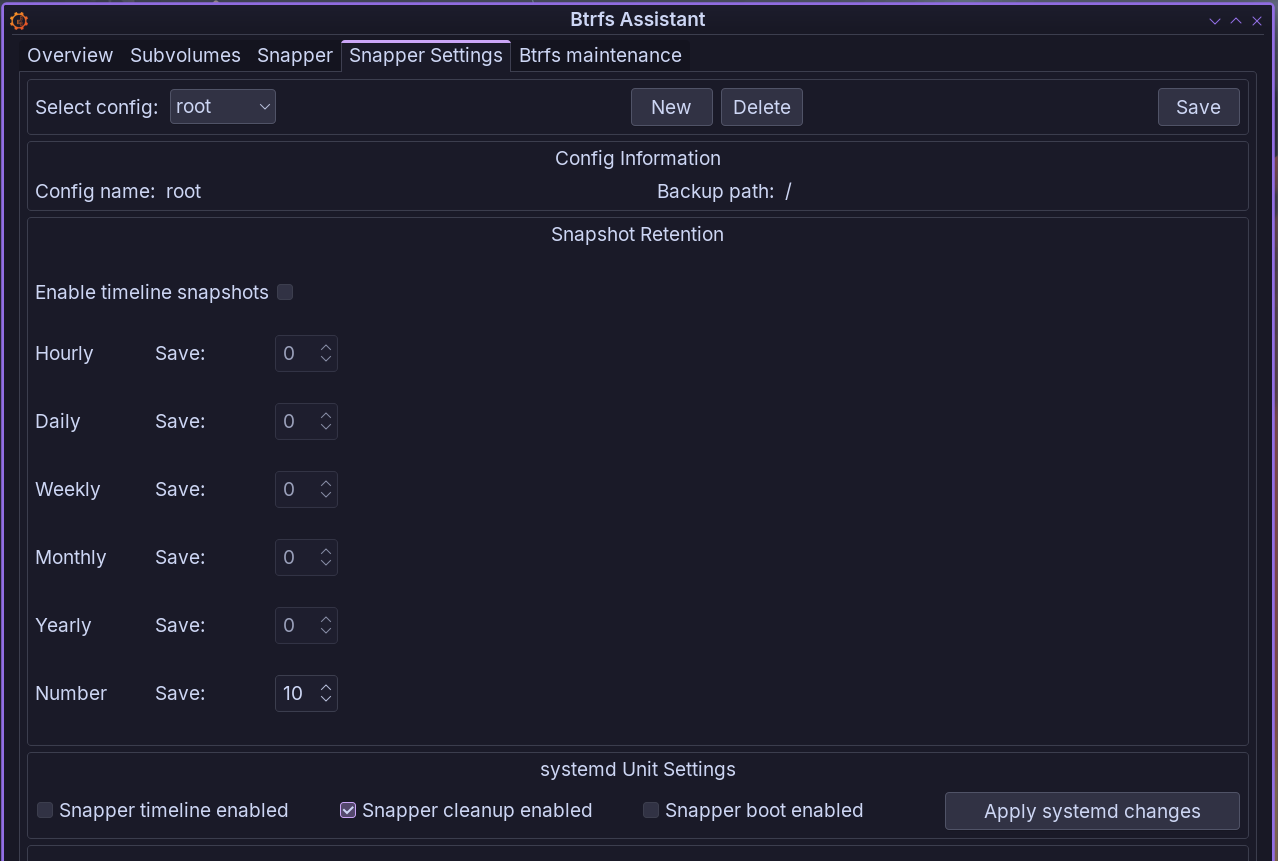
Modify the Snapshot Retention settings as follows:
- Ensure the
rootconfig is selected - Enter a value of
0for Hourly, Daily, Weekly, Monthly and Yearly. - Untick
Enable timeline snapshots. - Enter a value of
10toNumber. - Add a ✅ to
Snapper cleanup enabled. - Click on the
Savebutton on the top right andApply systemd changeson the bottom right. snapper-cleanup.timer will now be enabled to automatically clean up old snapshots based on your configuration.
- Ensure the
Removing Snapshots using Btrfs Assistant
Section titled “Removing Snapshots using Btrfs Assistant”-
Open Btrfs Assistant:
Terminal window btrfs-assistant-launcherAlternatively:
Terminal window sudo -E btrfs-assistant -
Go to the Snapper Settings tab:
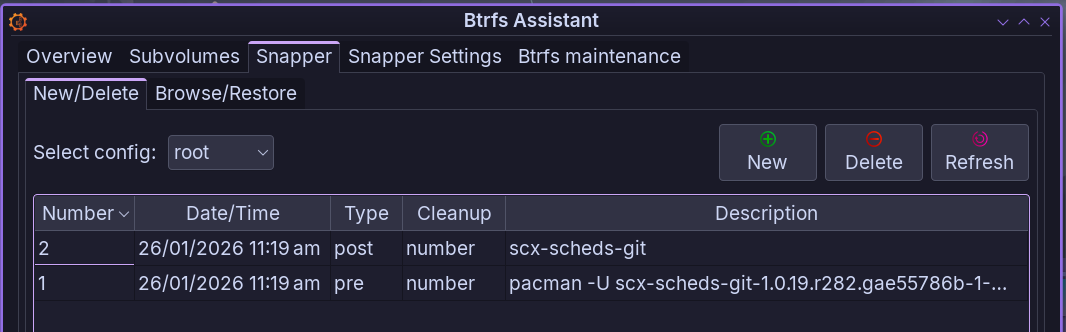
-
Select the snapshot(s) you want to delete from the list.
-
Click on the
Deletebutton located at the top of the window. -
Regenerate your bootloader entries to reflect the changes:
systemd-boot
Terminal window sudo sdboot-manage genGRUB
Terminal window sudo grub-mkconfig -o /boot/grub/grub.cfgLimine
Terminal window sudo limine-mkinitcpio
Check out their Official Wiki for a more in depth look about what can be done.
Snapper (CLI)
Section titled “Snapper (CLI)”Now that we covered what a Btrfs snapshot is and its use cases, let’s talk about how to manage them using a tool called Snapper created by Arvin Schnell from openSUSE.
CachyOS uses the following Snapper configuration by default:
# subvolume to snapshotSUBVOLUME="/"
# filesystem typeFSTYPE="btrfs"
# btrfs qgroup for space aware cleanup algorithmsQGROUP=""
# fraction or absolute size of the filesystems space the snapshots may useSPACE_LIMIT="0.5"
# fraction or absolute size of the filesystems space that should be freeFREE_LIMIT="0.2"
# users and groups allowed to work with configALLOW_USERS=""ALLOW_GROUPS=""
# sync users and groups from ALLOW_USERS and ALLOW_GROUPS to .snapshots# directorySYNC_ACL="no"
# start comparing pre- and post-snapshot in background after creating# post-snapshotBACKGROUND_COMPARISON="yes"
# run daily number cleanupNUMBER_CLEANUP="yes"
# limit for number cleanupNUMBER_MIN_AGE="1800"NUMBER_LIMIT="50"NUMBER_LIMIT_IMPORTANT="15"
# create hourly snapshotsTIMELINE_CREATE="no"
# cleanup hourly snapshots after some timeTIMELINE_CLEANUP="yes"
# limits for timeline cleanupTIMELINE_MIN_AGE="1800"TIMELINE_LIMIT_HOURLY="5"TIMELINE_LIMIT_DAILY="7"TIMELINE_LIMIT_WEEKLY="0"TIMELINE_LIMIT_MONTHLY="0"TIMELINE_LIMIT_YEARLY="0"
# cleanup empty pre-post-pairsEMPTY_PRE_POST_CLEANUP="yes"
# limits for empty pre-post-pair cleanupEMPTY_PRE_POST_MIN_AGE="1800"Here is a list of the most common Snapper commands.
Get current configuration:
sudo snapper get-configOutput Example:
Key │ Value───────────────────────┼──────ALLOW_GROUPS │ALLOW_USERS │BACKGROUND_COMPARISON │ yesEMPTY_PRE_POST_CLEANUP │ yesEMPTY_PRE_POST_MIN_AGE │ 1800FREE_LIMIT │ 0.2FSTYPE │ btrfsNUMBER_CLEANUP │ yesNUMBER_LIMIT │ 10NUMBER_LIMIT_IMPORTANT │ 10NUMBER_MIN_AGE │ 3600QGROUP │SPACE_LIMIT │ 0.5SUBVOLUME │ /SYNC_ACL │ noTIMELINE_CLEANUP │ yesTIMELINE_CREATE │ noTIMELINE_LIMIT_DAILY │ 0TIMELINE_LIMIT_HOURLY │ 0TIMELINE_LIMIT_MONTHLY │ 0TIMELINE_LIMIT_WEEKLY │ 0TIMELINE_LIMIT_YEARLY │ 0TIMELINE_MIN_AGE │ 1800List available snapshots + details:
sudo snapper listOutput Example:
# │ Type │ Pre # │ Date │ User │ Cleanup │ Description │ Userdata────┼────────┼───────┼──────────────────────────┼──────┼─────────┼──────────────────────────────────────────────────────────────────────────┼─────────0 │ single │ │ │ root │ │ current │715 │ pre │ │ Thu 22 Jan 2026 16:14:07 │ root │ number │ pacman -S -y -u --config /etc/pacman.conf -- │716 │ post │ 715 │ Thu 22 Jan 2026 16:14:25 │ root │ number │ docker-buildx lilv sof-firmware zed │717 │ pre │ │ Sat 24 Jan 2026 11:19:48 │ root │ number │ pacman -S -y -u --config /etc/pacman.conf -- │718 │ post │ 717 │ Sat 24 Jan 2026 11:20:19 │ root │ number │ bpf cachyos-hello cachyos-wallpapers cpupower jdk-openjdk ldb less libev │719 │ pre │ │ Sat 24 Jan 2026 11:20:31 │ root │ number │ pacman -U --config /etc/pacman.conf -- /home/mario/.cache/yay/visual-s │720 │ post │ 719 │ Sat 24 Jan 2026 11:20:36 │ root │ number │ visual-studio-code-bin │721 │ pre │ │ Sat 24 Jan 2026 20:46:40 │ root │ number │ pacman -Syu plasma-login-manager │722 │ post │ 721 │ Sat 24 Jan 2026 20:46:48 │ root │ number │ cmake fastfetch harfbuzz harfbuzz-icu jdk21-openjdk lib32-harfbuzz lib32 │723 │ pre │ │ Sat 24 Jan 2026 20:46:53 │ root │ number │ pacman -R sddm-kcm cachyos-themes-sddm sddm │724 │ post │ 723 │ Sat 24 Jan 2026 20:46:56 │ root │ number │ cachyos-themes-sddm sddm sddm-kcm │725 │ pre │ │ Sun 25 Jan 2026 08:05:05 │ root │ number │ pacman -S -y -u --config /etc/pacman.conf -- │726 │ post │ 725 │ Sun 25 Jan 2026 08:05:11 │ root │ number │ plasma-login-manager │727 │ pre │ │ Sun 25 Jan 2026 15:55:28 │ root │ number │ pacman -S --config /etc/pacman.conf -- cachyos-extra-znver4/caligula │728 │ post │ 727 │ Sun 25 Jan 2026 15:55:30 │ root │ number │ caligula │- Here is a summary of the columns:
#: Indicates the snapshot number which is used in other commands.Type: Indicates whether the snapshot is a single snapshot or part of a pre/post pair.single: These snapshots have no special relationship to other snapshots.pre: These snapshots are meant to be taken before any kind of system change (like editing a file or installing a package).post: As the name implies, these snapshots refer to snapshots taken after a system change has occurred. They are linked to their correspondingpresnapshot.
Pre #: Forpostsnapshots, this column indicates the snapshot number of the correspondingpresnapshot.Date: The date and time when the snapshot was created.User: The user who created the snapshot.Cleanup: Indicates the cleanup algorithm applied to the snapshot.- There are several cleanup algorithms available in Snapper, such as
number,timeline, and empty-pre-post. In this example, thenumberalgorithm is used, which means that older snapshots will be deleted based on a predefined limit. - timeline: Snapshots are cleaned up based on their age and frequency.
- empty-pre-post: Deletes pre/post snapshot pairs with empty diffs.
- There are several cleanup algorithms available in Snapper, such as
Description: A brief description of the snapshot, often indicating the reason for its creation.Userdata: Additional user-defined data associated with the snapshot. For more details about the output columns
Create a new snapshot:
sudo snapper create --type single --description "My Snapshot Description"Modify a snapshot:
sudo snapper modify <option> <snapshot_number>Available options:
Options for 'modify' command: --description, -d <description> Description for snapshot. --cleanup-algorithm, -c <algo> Cleanup algorithm for snapshot. --userdata, -u <userdata> Userdata for snapshot. --read-only Set snapshot read-only. --read-write Set snapshot read-write. --default Set snapshot as default snapshot.Example: Modifying snapshot 729 description:
sudo snapper modify 729 --description 'My New Snapshot Description'Deletion of snapshots:
Delete a single snapshot:
sudo snapper delete <snapshot_number>Delete a range of snapshots:
sudo snapper delete 718-721Snapshot 718, 719, 720, and 721 will be deleted.
Snapper Documentation
Section titled “Snapper Documentation”Official Snapper’s command man page:
Snapper Configuration File guide:
Limine Recommendations & Tips
Section titled “Limine Recommendations & Tips”Tweak Limine bootloader Snapshots Display Settings
Section titled “Tweak Limine bootloader Snapshots Display Settings”- Limit the number of snapshots shown in the Limine bootloader menu to avoid clutter:
- Create a backup of the limine-snapper-sync configuration file:
Terminal window sudo cp /etc/limine-snapper-sync.conf /etc/limine-snapper-sync.conf.orig - Edit the limine-snapper-sync configuration file:
Expected output snippet:
Terminal window sudo nano /etc/limine-snapper-sync.confOptionally, adjust the Snapshot Name Format:Terminal window ### Max Snapshot Entries### Sets the limit for how many snapshot entries show up in the boot menu.### This depends on the size of your FAT32 boot partition and how many different kernel and module versions you want to keep.### A larger FAT32 boot partition allows more snapshot entries.MAX_SNAPSHOT_ENTRIES=10Terminal window ### Snapshot Name Format### Choose a format for how snapshot entries look in the Limine bootloader:### 0. ID=111 2023-12-20 10:59:59 (default)### 1. 111│2023-12-20 10:59:59### 2. 111 │ 2023-12-20 10:59:59### 3. 2023-12-20 10:59:59│111### 4. 2023-12-20 10:59:59 │ 111### 5. 2023-12-20 10:59:59### 6. 111### 7. 111│snapshot description### 8. 2023-12-20 10:59:59│snapshot description### 9. │snapshot descriptionSNAPSHOT_FORMAT_CHOICE=88is a good choice as it shows the date and time along with the snapshot description. - Save the file and exit by pressing
CTRL+OEnterCTRL+X
Restoring from a Snapshot
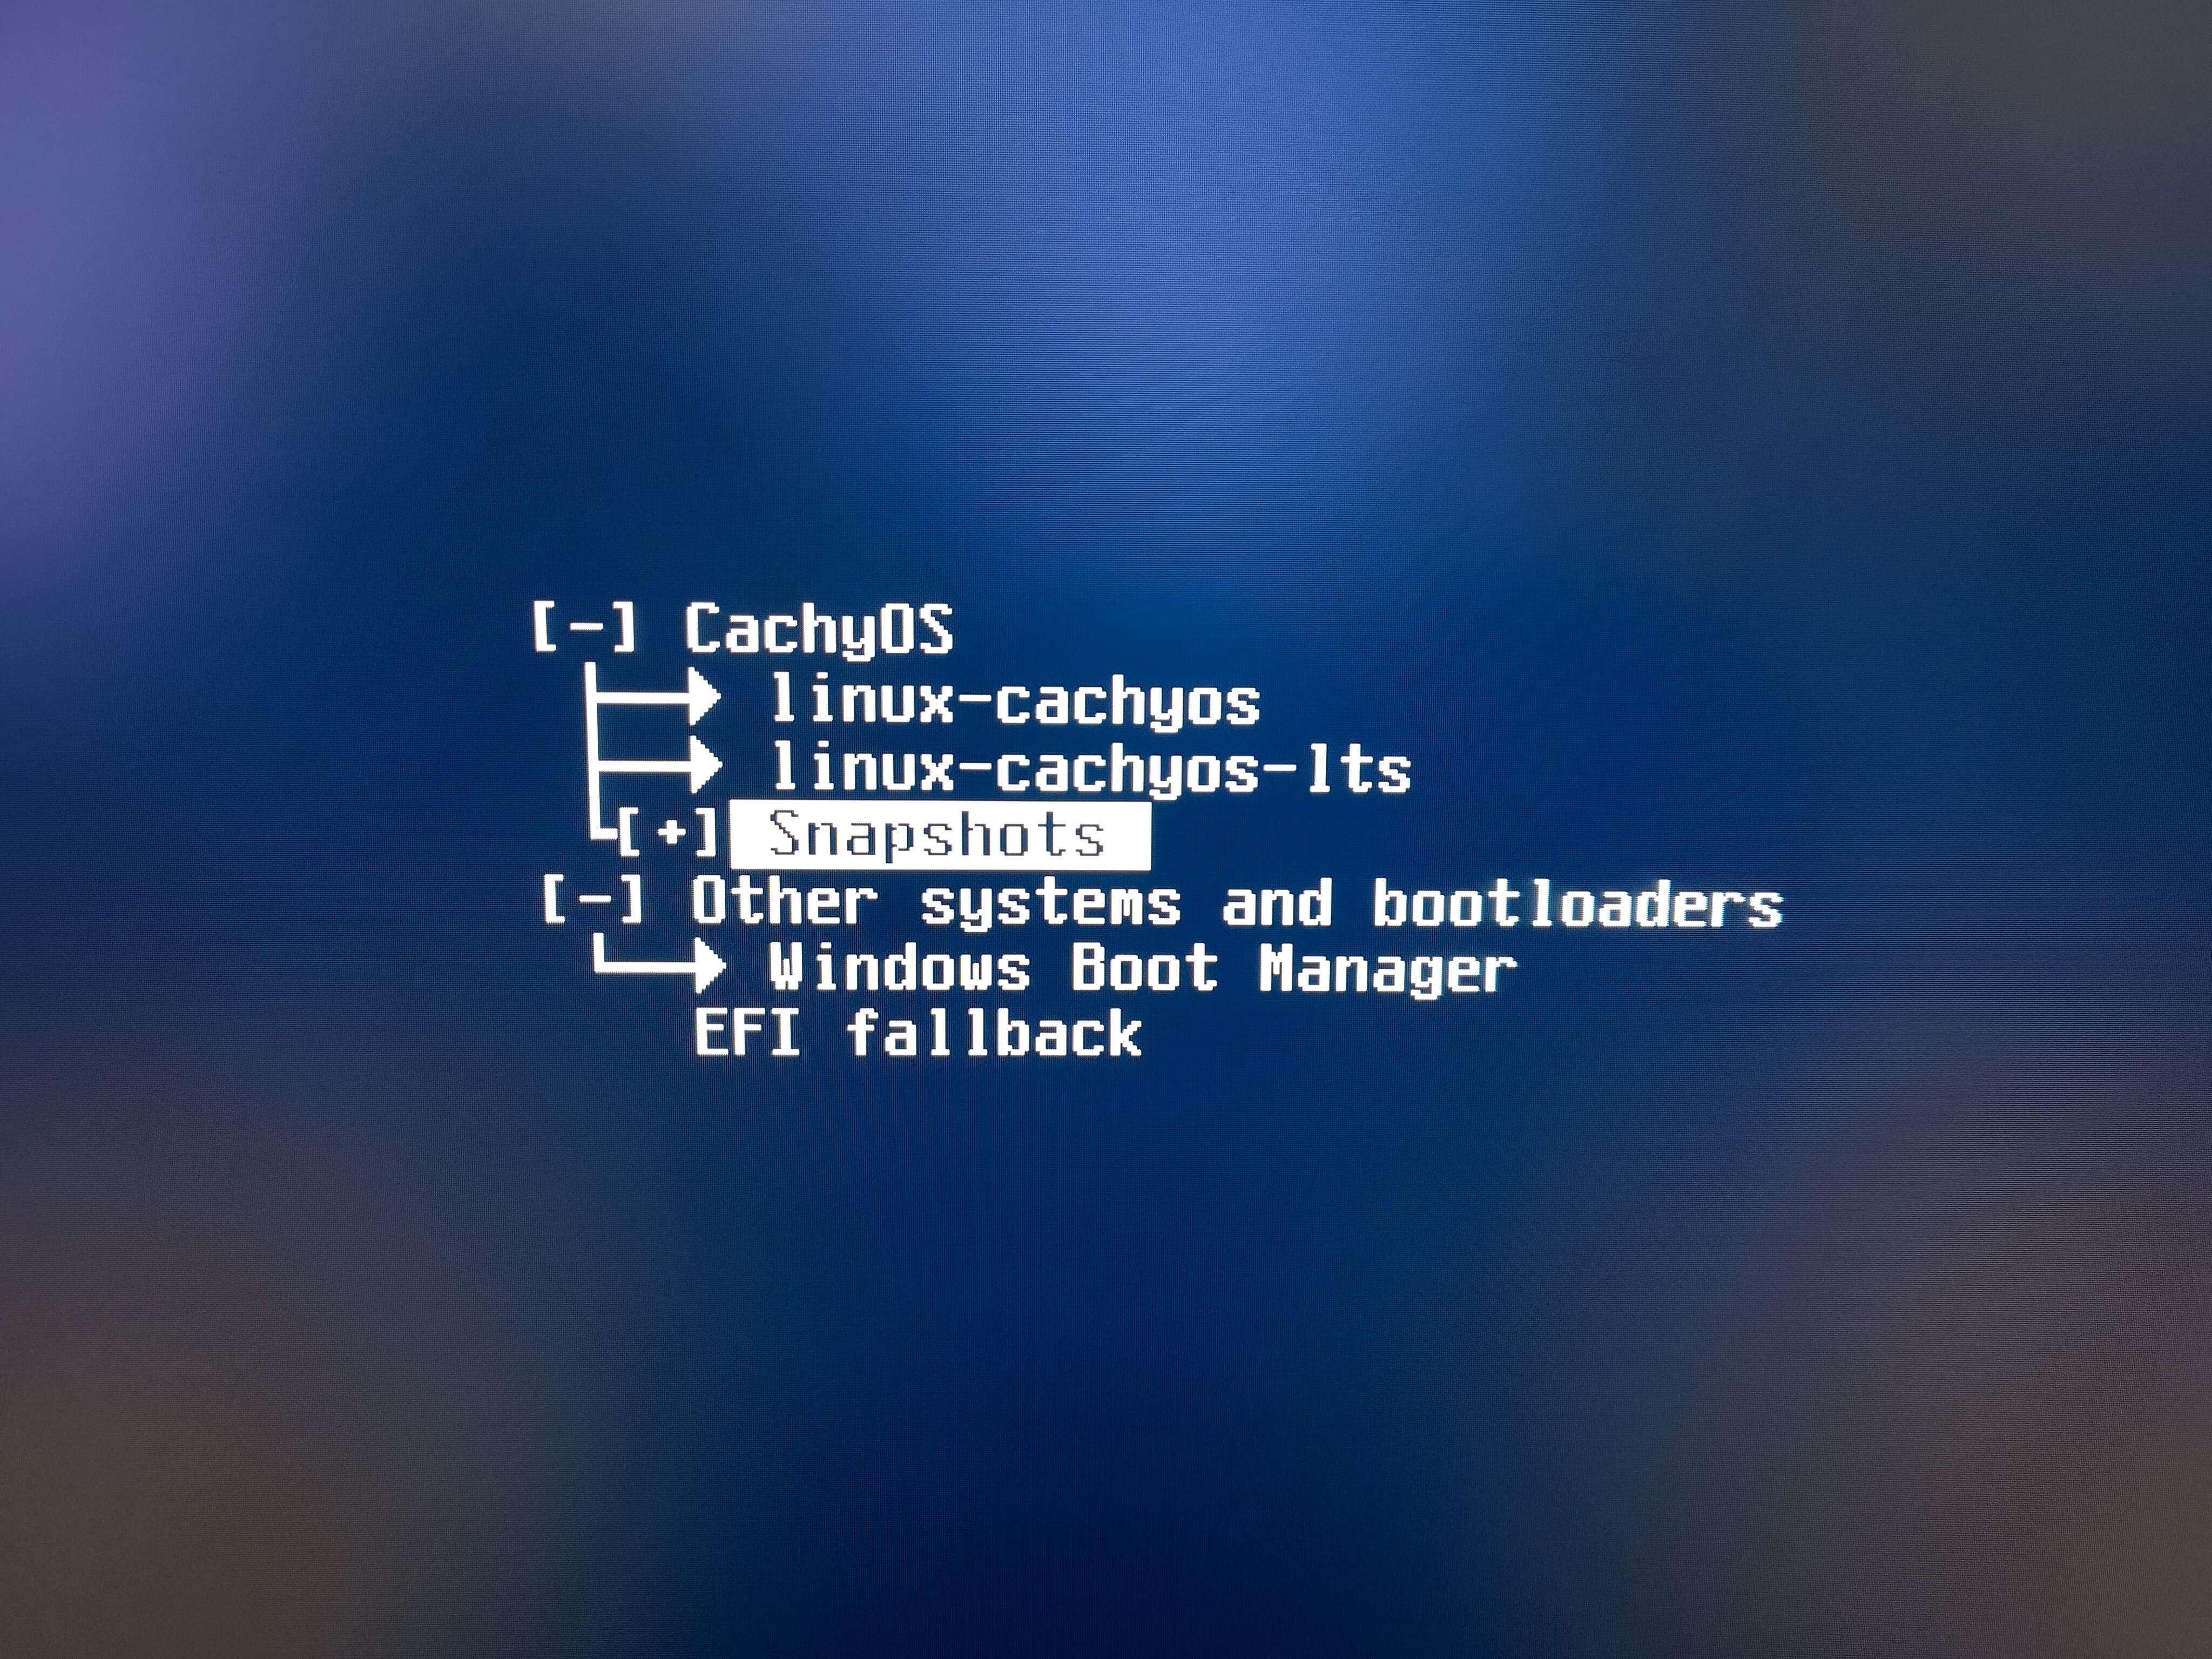
Section titled “Restoring from a Snapshot”Limine
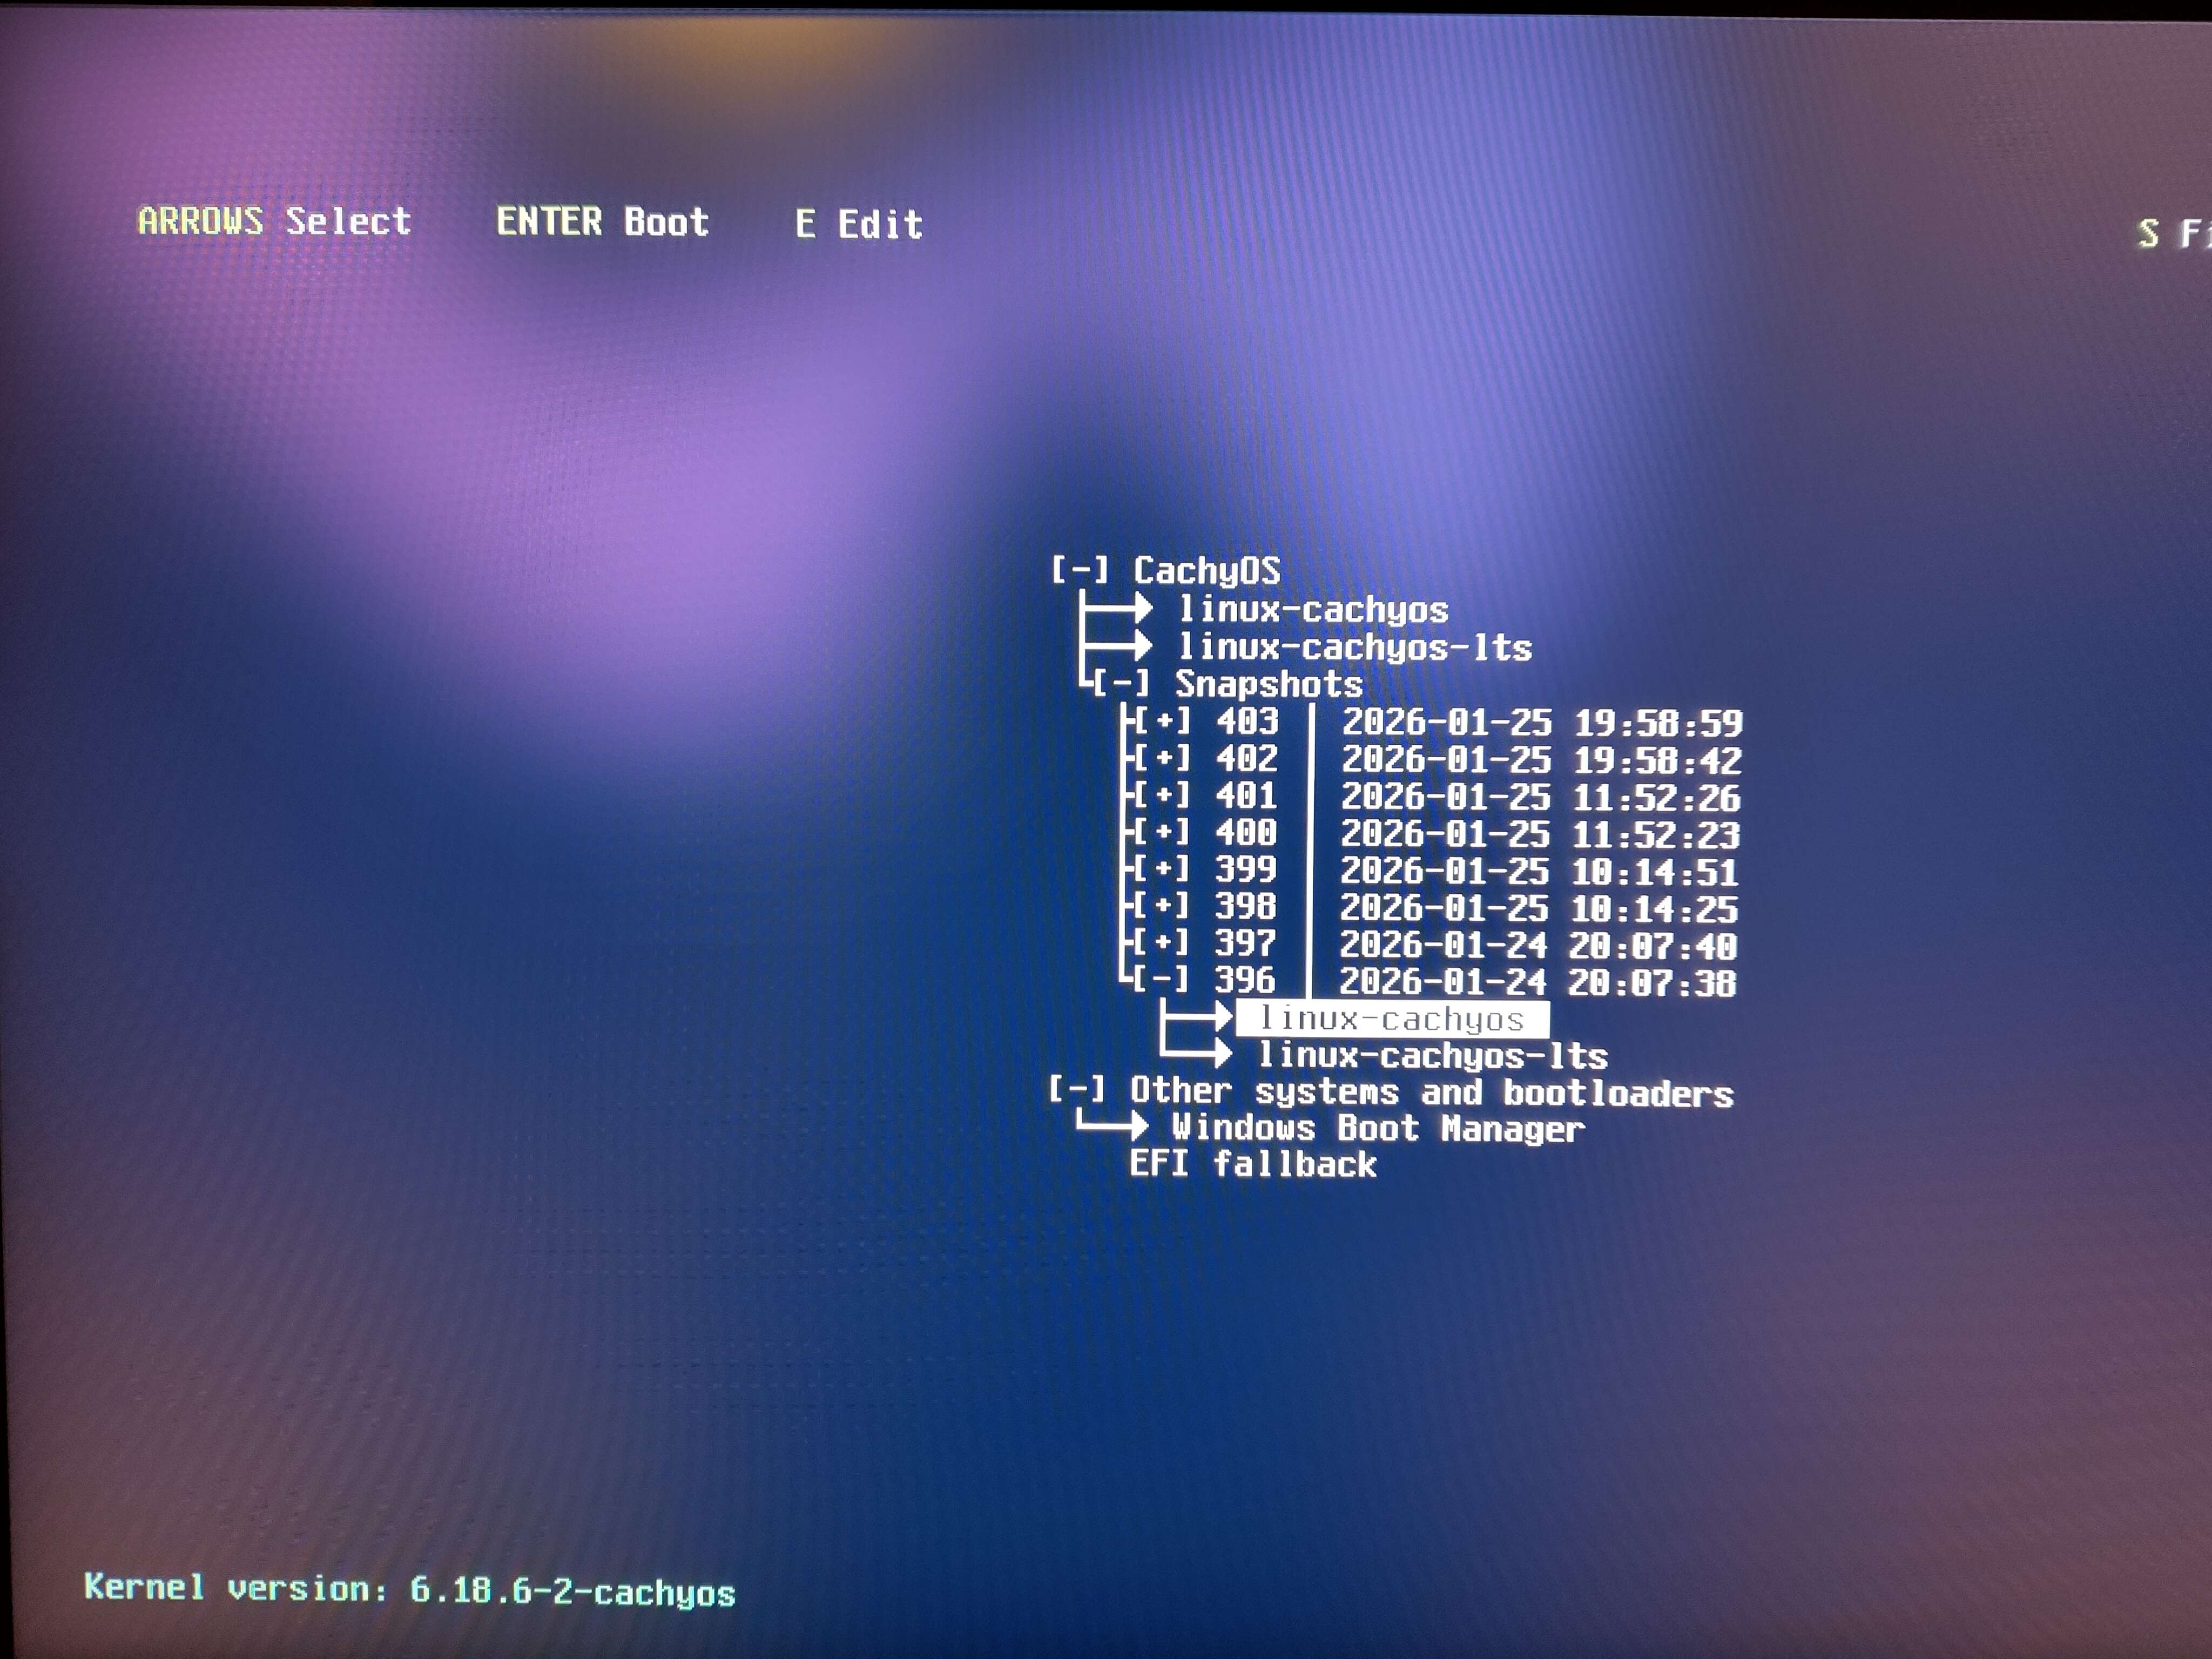
- From the Limine bootloader menu, navigate to the Snapshots menu:
- Select the snapshot & kernel you want to restore from:

- Your system is now in
read-only mode. A pop up notification should appear indicating that a snapshot was detected asking to restore from it: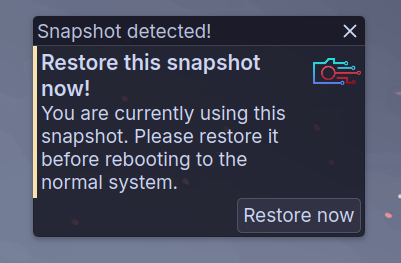
- Click on
Restore now. A terminal window will open with a prompt and ask for some confirmations:Example Restore Prompt Snapshot ID : 2Date : 2026-01-26 11:19:14Description : nc-gitRestore method : replaceConfirm restore of snapshot 2 using the "replace" method?Type [y]es to restore, [l]ist to display all snapshots, or [c]ancel to abort.Your input: yesEnter a description for the "backup" of the subvolume: @Your input: @ - Type
yesand optionally add a description for the backup snapshot. - The restoration process will begin. Once completed, Type yes once again in the new prompt to reboot your system:
Terminal window The restore is complete. Please reboot now:Type [y]es to reboot, [n]o or [c]ancel to abort rebooting.Your input: yes
GRUB
-
From the GRUB bootloader menu. Boot into the desired snapshot & kernel you want to restore from.
-
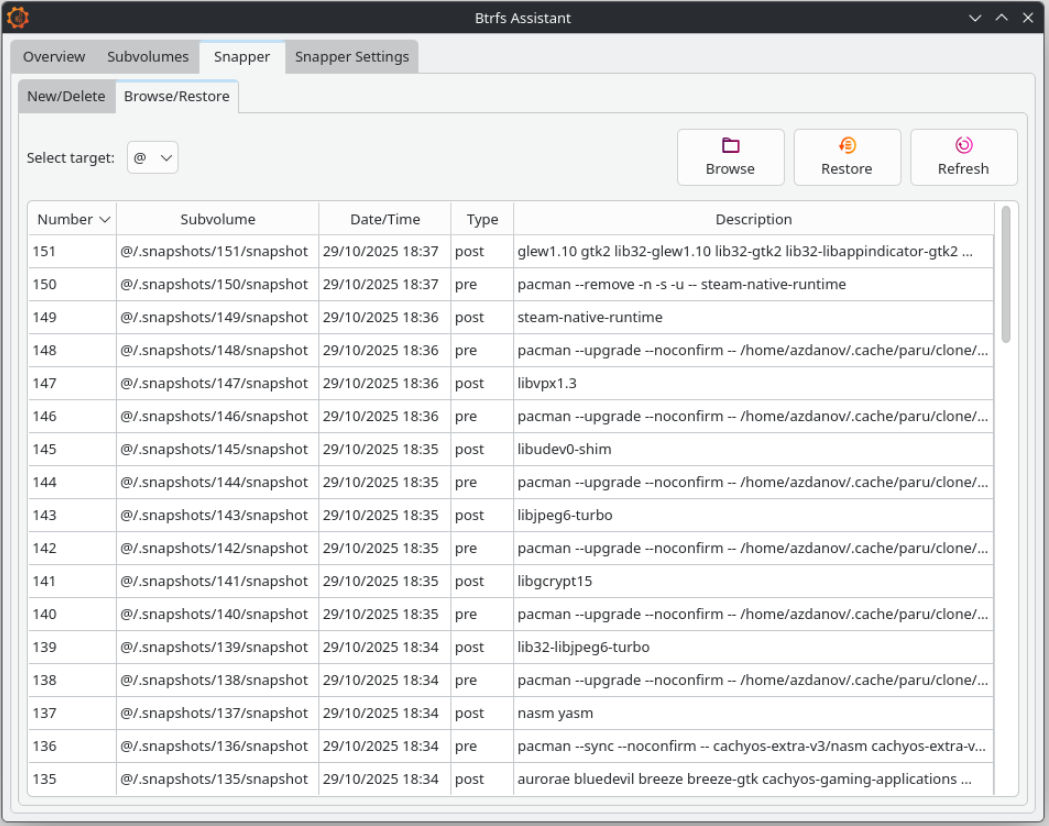
Once booted. Open Btrfs Assistant:
Terminal window btrfs-assistant-launcherAlternatively:
Terminal window sudo -E btrfs-assistant -
Go to the Snapper tab → “Browse/Restore” tab and select the snapshot you booted from:
-
Click on
Restorebutton and reboot your system to apply the changes.